Saturday, 27 September 2014

Animal Eyes - Soft Pastel Blending


Blending Techniques

 
Soft pastels are one of my year three classes most favourite mediums They love experimenting with smudging and blending techniques. This was the first lesson they had used them and what an exciting time it would turn out to be. The class text was Anthony Browne's ZOO. The broadness of this text really gave me the freedom to plan lots of opportunities for the children to explore different mediums. This particular session we looked at different animal eyes and tried to guess the animal it belong to. The children then got the select an eye of their choice to recreate using soft pastels. It was just seconds after taking this photograph that another class cooking pancakes set off the fire alarm. We spent then next 45 minutes on the playground waiting for the fire brigade to switch off the alarms. Luckily there was no real fire just some smoke. Though it was pleasing to hear my class worry about if their art work would be burnt or if they would have time to finish it before home time.
 
As a filler in the next session to allow for those who didn't get to finish, due to all the excitement of the visit from the fire brigade, I did a ripped paper animal print collage.


Andy Warhol - Pop Art Tiles


 These have to be my most favourite pieces I have ever done with my year 6 class. Although some of the girls would disagree as they felt their photos were don't to their liking. Girls! I would absolutely love to take credit for this concept from start to finis but this was a You Tube find. Click here for the link to the video.


We used air drying clay as the school doesn't have a kiln. The only trouble I found with this was if they had rolled the clay too thin then it made them fragile, especially around the corners.

Land Art - Uing Natural Found Materials


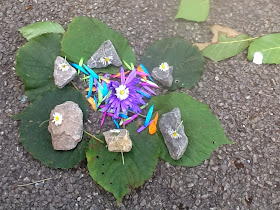
Land Art
 
 
This great Autumn term theme is a wonderful way to introduce the children to land art. Covering artist such as Andy Goldsworthy and Richard Long. The children collected natural materials from the school grounds as we're very fortunate to have some beautiful surrounding. If you don't have a natural resource for the children to gather materials from this could be combined with a school trip. It's a fantastic outdoor activity if you are going on a bear hunt or looking for the Gruffalo. What's also wonderful about this type of art is the children's age or ability really don't impact on the results. I spoke to the children before hand about natural forms and shapes and discussed the work and materials involved in Andy Goldsworthy and Richard Long. We are very lucky that Richard Long has completed a number of pieces in the city and has worked her for years, giving this unit another local history link.


Then I just let them loose and enjoyed the buzz of excitement and creativity.


I followed this activity up with another opportunity for the children to use natural materials to make pictures. we had some left over leaves from this activity so we used these to make animal pictures. Arranging the different shapes and coloured leaves to represent animals from the woodland and glue them into our sketchbooks.


Saturday, 20 September 2014

Apps and Art


Using technology to create and explore art is a must in my book. I know the new 2014 curriculum has removed the use of technology completely but it can't hurt the children to still give them the opportunity to use technology in this was. When you think about how much technology is integrated in our day to day lives. It also provides a another cross curricular link.

Above is a picture of my daughter who created this Andy Warhol themed print out using an IPad app. Below are a number of useful apps that will get the children, in class or in their own down time, exploring the world of art.

Spin ART+ - great for
Girl Talk Art - based on a girls magazines but holds many art and design projects for upper KS2 and upwards.
Crayola Paint & Create -  drawing and painting app with option to use stickers and print the finished product.
Spray Can - Great app for exploring street art and graffiti without the health and safety aspect of using aerosols.
MoMa Art Lab - The Museum of Modern Art activities for creating artwork.
PlayART Van Gogh - manipulate and recreate Van Gogh most famous pieces of art - Good for introduction to Van Gogh's work
PlayART - 8 other famous artist to explore
Glow Draw - good for creating bonfire night scenes for the 5th of November.
How to Draw -  free lessons on sketching and drawing.
Andy Warhol Camera - App that manipulates colour and contrasts (used for picture above)
Pop Art FX - similar to above but more detailed

Strategies To Get The Children Thinking About Art

Facebook - Display


Even in a primary school children know how Facebook works and how to navigate it. I created a Facebook display board as another strategy to communicate facts and quotes about specific artist or artistic movements and techniques. The children also get to see related works of art through the photos tab and can respond to the artists status, by adding a comment in the comment boxes, that have been laminated.
 
This has been a favourite addition to my art room since the return to school in September where currently Homer the Greek Poet has shared his views on ancient Greek sculpture.
 

Ping Pong Critique

 
Ping Pong Ball Critique.  Here is a list of 30 questions that you can write on ping pong balls to make talking about art with kids more fun.
 
This has to be the best way I have found to introduce art language an concepts to my classes. Not only does it really make them look at the piece of art in front of them but they begin to draw comparisons between different artists and their own work which at the age of eight is fantastic critical thinking. I would like to take credit for this myself but I found this via Pinterest. The list of thirty art critique questions which I are free to download fro Teachers Pay Teachers can be written on a range of objects not necessarily ping pong balls but the children really loved digging deep into my jar and rattling them around. I would love to find an old bingo machine that I could turn the handle and wait for a ball to drop out.  


Lighthouses - The Lighthouse Keeper's Lunch

 Lighthouses made from Pringle pots. Yes Pringle pots. I know that a large pot of Pringles contain an entire days worth of calories but I did have help in eating all 30 tubes so that my year 1 class could complete this project.


I provided the children with a Pringle tube, strips of coloured paper, a clear plastic cup, a paper plate, glue sticks and scissors. Applying the red and white strips of paper to the Pringles tube was a great opportunity to bring Maths into the session, by encouraging use of a repeating pattern.


The children then added detail using black paper for windows and doors. The also use felt tips on the reverse of a paper plate to create a rock and sea impression. Finally to finish we popped an electric tea light on the top of the tube and covered the inside of the clear plastic cup with a thin yellow paper which allowed the tea light to shine through.

This was a really enjoyable lesson and look great on display at the front of the school. Don't forget to get some help with eating all the Pringles!

Wednesday, 17 September 2014

African Djembe Drums

African Djembe Drums were a great design and technology project for my year 3 and 4 . It linked with our Global Partnership school in Uganda and with our power of reading text about stories from other cultures. the children taped together two plastic cups (make sure they are of good quality otherwise they can break). We then applied two good layers of papier mache. I have used many different papier mache recipes but the simplest is the best. click here for my favourite Youtube video recipe.
Obviously this is a two week project as the papier mache needs a good 24 to 48 hours to dry. Whilst the drums were drying we took the opportunity to watch some videos of classic Djembe drumming which the children really enjoyed. One of the classes had received African drumming lessons in the year previous so could bring their own knowledge to the lesson. I asked the children to record in their sketch books any observations of colour and patterns they saw on the drums ready for the next weeks lessons.

The following week once the drums were fully dried and strong we painted them using our sketches in our sketchbooks as a reference. Some of the children chose to paint it then let it dry and use markers to add detail but others chose to use paint to add the detail.

Finally the last stage was to use good quality or large balloons to cover the open end of the drums and secure in pace with elastic bands. I used the large rice balloons, that remind me of summer fetes when I was a kid, that I cut in two.

Something I never got round to doing sue to time constraints and the children's age/ ability was to  use string as an extra adornment to create a zig-zag pattern around the top half.

Sunday, 14 September 2014

Stone Age Art


Cave Art in Clay


My Year 5 and 6 classes were studying the book Wolf Brother by Michelle Paver. This type of topic and text really gives plenty of opportunities to tie in with other curriculum subjects. Best of all ART! So, it was time to break out the clay. We looked at examples of cave paintings and had great fun trying to interpret the pictures putting a story to the picture. This works great as a precursor to moving the children on to looking at other great pieces of art when asking them to think critically. We flattened out lumps of clay, with our hands, to give an uneven surface mimicking that of a cave. Make sure that the slab of clay is no thinner than half a centre metre as it will break when dry. The children then used tools or pencils to draw stick figures in the slab of clay. Many of the children shared the story behind their pictures whilst working. I chose to use air drying as we don't have a kiln at the school but this will work with either types of clay.  

The next week, once the slabs had dried, we sponged orange and yellow paint, in to layers, over the slab. Finally we paint in the imprint with black paint using a fine brush.

Roald Dahl Day September 2014

As many of you may know it is Roald Dahl day this month and you may or may not have arrangements in school to celebrate the great work of one of the world's greatest children's authors. But lets not forget about the wonderful Quentin Blake who brought Roald Dahl's fantastical characters to life. My year 3 and 4 classes studied George's Marvellous medicine in class so I came up with a couple of lesson plans around Quentin Blake to link to their class topic.

Bubble Pictures

 
The children combined paint and washing up liquid with water, in large bowls and blew threw straws until the mixture bubbled up above and in some cases over the bowl. They then lay their cartridge paper over the mixture to capture the bubble affect. Be sure to use good washing up liquid and thick paper or it will curl and the bubbles may not be good enough.

 
Once dried the children added sketched characters using lines like Quentin Blake to complete the scene of George and his Marvellous medicine.
 

Grandma watercolour

 
During our second session we watched videos of Quentin Blake at work form his official website. I drew the children's attention to the way he sketched his designs in lightly at first the added watercolours. We then watched another video of the late and great Rik Myall on the BBC's Jackanory reading Roald Dahl's George's Marvellous Medicine. I forwarded to the section where George describes his Grandma sitting in her arm chair in the front room. We jotted down noted on the features and description of Grandma. This bought lots of laughs when George describes his grandma's mouth as looking like a dogs bottom. The children then created their own sketched of Grandma based on the superb writing of Roald Dahl adding watercolours once they were happy. As a plenary we looked at Quentin Blake's sketch of Grandma from the book and compared it to our own work.
 
 
Click here for Quentin Blake demonstrating his techniques.
Click here for Quentin Blake interview


Welcome

Welcome to the Primary Art 123 Blog. I'm an art teacher in the primary setting in the United Kingdom. I have recently been asked to share some of my resources and lessons with others at a professional development day, so I thought what better way than to document my day to day work than to create a blog. I work for an academy chain providing cover for teachers non contact time. I'm fortunate deliver the art and design curriculum to children aged five to eleven years old. 
 
The blog will share teaching strategies and lesson ideas that I have covered in the last two years. The school I work at currently have a two year rolling curriculum. I try where ever possible to link the lessons I deliver to other subjects the children are studying a the time. I hope you enjoy the blog and maybe even get inspired to use some of the strategies and lesson with your children.
 
Jackson Pollock - Art Club - Artist Study
My KS2 Art Club recently conducted an artist study of the work of Jackson Pollock. We looked at his work and discussed materials and methods he used. Then came the fun bit. I took a great opportunity at the end of the summer term to collect up all near empty bottles of paint without the school. Even the ones that had been hiding underneath the sink in all the other classrooms. This was not only great house keeping for the other teachers but it allowed me to get a picture of the resources I needed to order for September. We also took advantage of the sunny weather and went outside on the playing field. After reminding the children of the wrath of their parents if they got paint over their uniform they fully enjoyed experimenting with splashing, throwing and dripping paint. It was great to her them independently discussing their results using core art vocabulary. Yes it does help if you have a few days of clear weather as I left the finished results outside for a couple of nights until they dried fully. The boards made a great adornment to the school entrance hall.